
Dogechain native staking went live on November 14, 2022, which begun the transition to a Proof of Stake consensus on the network. That said, Dogechain uses a unique staking model that might be unfamiliar to some. For this reason, we created this tutorial that will guide you through the veDC locker UI and its features.
If you wish to learn more about the veDC staking model, make sure you read our first two posts on the subject:
To learn about the practical side of staking on Dogechain, continue reading this guide.
Dogechain $DC Locker user interface overview
First things first, to access the staking platform, visit https://bridge.dogechain.dog/pos/locker
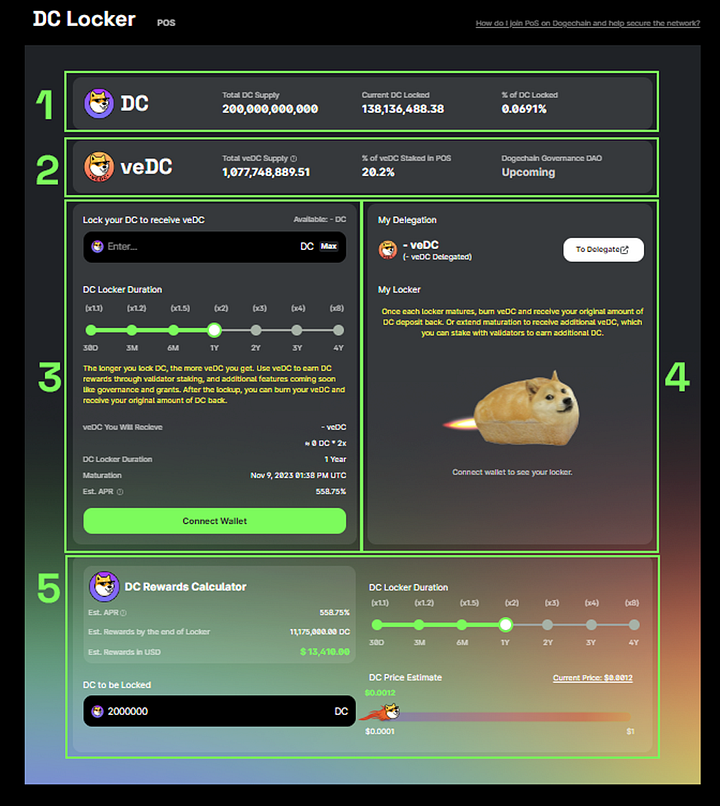
The UI of the $DC locker is comprised of a few essential modules.
- Overview of the supply of $DC and the amount locked in the veDC locker across the entire network.
- Overview of the supply of $veDC and the amount locked in with validators across the entire network.
- The Locker module which allows you to:
- Select the amount of $DC to lock in the veDC locker
- Select the length of your timelock
- Provides estimates on how much $veDC you will receive after your lockup.
4. The Delegation module which allows you to:
- Access the delegation interface for $veDC tokens
- Provides an overview of all of your lockups and their maturation periods
- Allows you to increase the length for every one of your lockups as long as they are lower than the maximum timelock.
5. The $DC rewards Calculator module which allows you to input different data points such as the number of tokens, timelock period, and $DC valuation slider. The combination of this information provides you with an estimate of your achievable rewards.
⚠️ Please note that the numbers provided by the calculator are only rough estimates and might not reflect real-world yields.
Let’s have a look at how to use each one of these modules.
DC locker module
Before you are able to stake on Dogechain, you will need to obtain $veDC tokens. These are acquired by locking up $DC in the veDC locker, using fixed lockup periods.
$veDC tokens cannot be sold or transferred, which means their only purpose is to be used within the Dogechain ecosystem, for staking with validators and voting in the Ecosystem DAO.
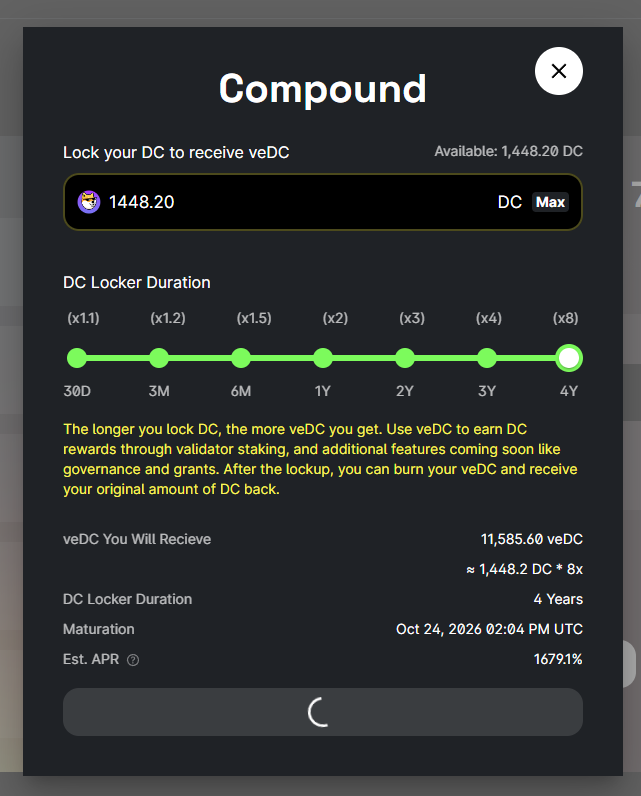
The longer the user chooses to lock $DC, the more $veDC they receive:
- 1 month — x1.1 amount of $veDC
- 3 months — x1.2 amount of $veDC
- 6 months — x1.5 amount of $veDC
- 1 year — x2.0 amount of $veDC
- 2 years — x3.0 amount of $veDC
- 3 years — x4.0 amount of $veDC
- 4 years — x8.0 amount of $veDC
This directly translates into higher staking rewards or more voting power in the Ecosystem DAO. This way, even modest holders get rewarded, as long as they commit to locking up their $DC for extended periods of time.
⚠️ Please note that the locking $DC is not reversible and requires full commitment from the user. The underlying $DC can be unlocked only when the timelock period has achieved maturation.
How to lock $DC — Step-by-Step Guide
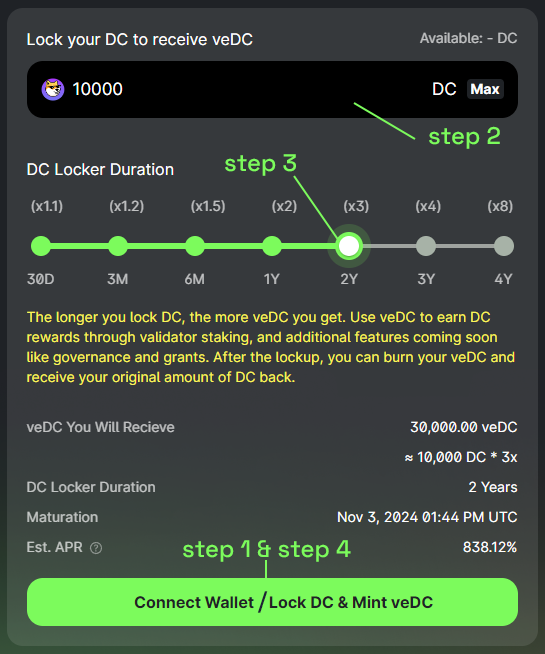
The process of locking up $DC in the veDC locker is pretty straightforward.
- Step 1 — Connect your Dogechain mainnet wallet to the app.
⚠️ Please note that only native $DC on the Dogechain mainnet can be used for this purpose. If you own $DC on Ethereum and wish to use this feature, you will need to bridge them over using a third-party bridge such as multichain.org.
- Step 2 — Input the amount of $DC that you wish to lock up
- Step 3 — Choose the timelock period for that amount of $DC
⚠️ Please note that you can have different timelock periods for different amounts of $DC. These will be summarized in your Delegation module.
You can also see the amount of $veDC you will receive following your timelock, the maturation period, and the estimation of your APR%
- Step 4 — Confirm your lockup by clicking “Lock DC &Mint veDC”
⚠️ Please note that locking up $DC is final and irreversible. You will be unable to unlock these tokens until the timelock matures.
Delegation Module
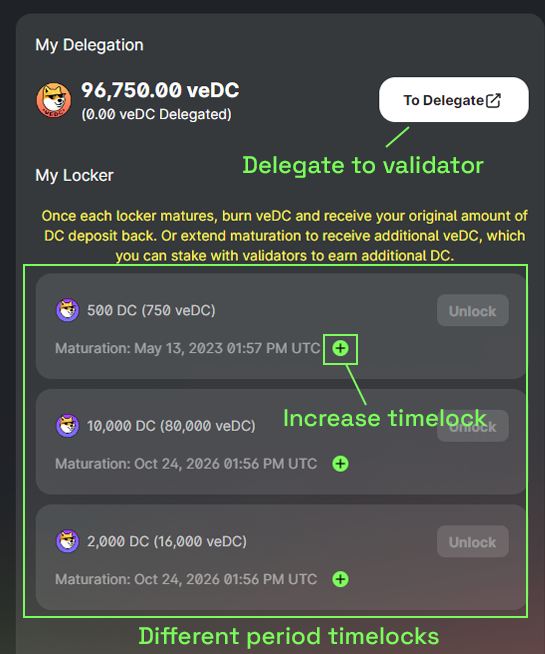
This module provides you with an overview of the total $veDC you have delegated with validators.
Moreover, it provides you with a list of all of your $DC timelocks, and their maturation periods.
You can increase timelocks by clicking on the ➕ icon and receive more $veDC for that particular timelock.
- Step 1 — Click the ➕ icon on the timelock of your choice
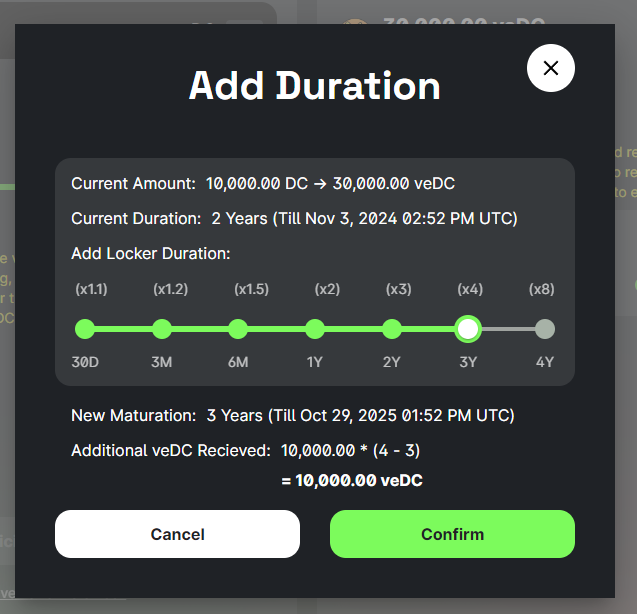
- Step 2 — Increase the timelock to your desired length. The UI will provide you with an estimate of the number of additional $veDC you will receive.
⚠️ Please note that you can prolong the timelock only if it’s inferior to the maximum amount (4 years)
By clicking on the “To Delegate” button, the interface will guide you to the PoS section where you will be able to choose validators and stake $veDC. Let’s have a look at how this works.
Dogechain PoS user interface overview
The PoS interface provides you with an overview of the state of the network, including
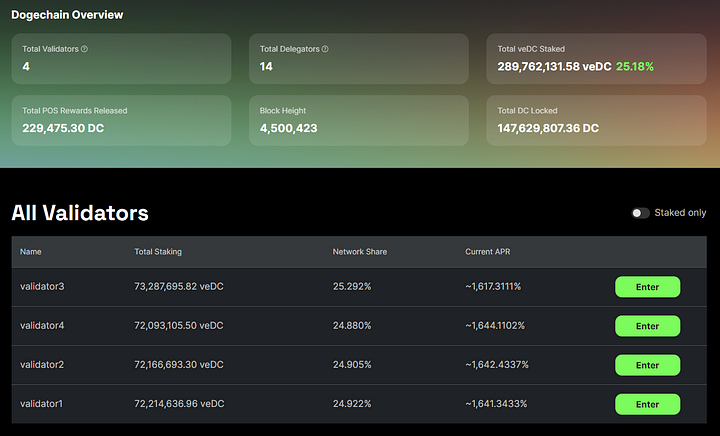
- Number of validators and delegators
- The total $veDC staked with validators, and their percentage in relation to the total supply of $veDC.
- The amount of $DC rewards released up to that moment
- The block height of the chain
- The total amount of $DC tokens locked in the veDC locker
- A list of all the available validators on the network.
By clicking on the “Enter” button for each one of those validators, you will be taken to the Delegation interface with that validator.
Delegating & Withdrawing $veDC to/from a Validator
The Delegation interface is where you can begin staking your $veDC with the validator of your choice. Moreover, it allows you to claim your $DC rewards and/or compound them to lock them in the veDC locker and increase your yields.
Delegating $veDC to a validator
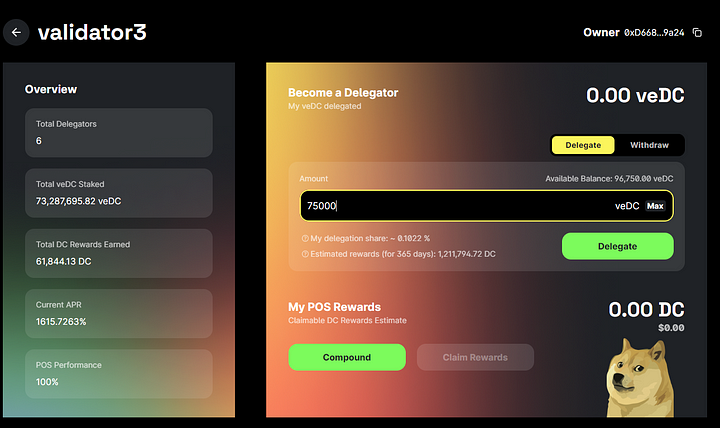
- Step 1 — Click on the “Delegate” tab.
- Step 2 — Input the amount you wish to stake and click “Delegate” to confirm.
⚠️ Please note that you can unstake your $veDC after a full epoch on the chain translating roughly to ~2 hours.
Withdrawing $veDC from a validator
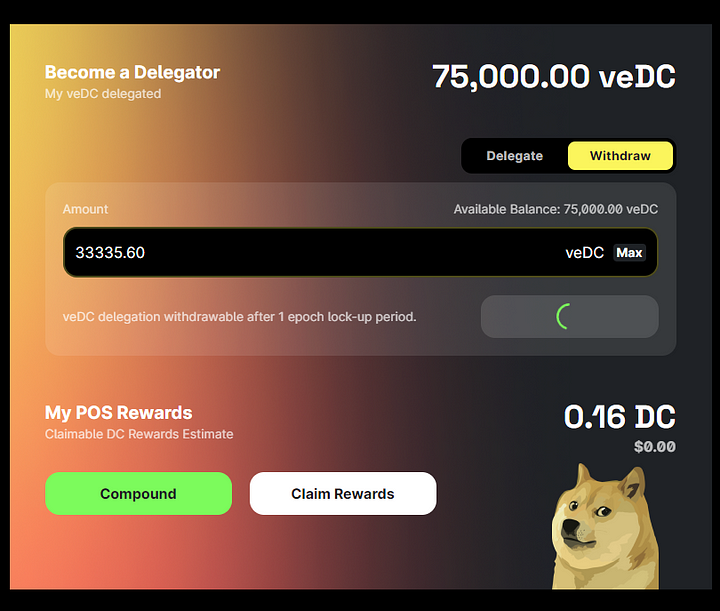
- Step 1 — Click on the “Withdraw” tab.
- Step 2 — Input the amount you wish to withdraw and click “Withdraw” to confirm.
⚠️ Please note that you can redelegate your unstaked $DC immediately after you have received them in your Metamask wallet.
Claiming $DC rewards
The interface will provide you with a number of $DC that you can claim for staking your $veDC. You can claim $DC at each block generation, so realistically, as often as you would like.
Simply click on the “Claim Rewards” button and sign the transaction to see the $DC transferred to your wallet address.
Compounding
You can directly access the veDC locker from this interface and mint more $veDC. This is very handy in case all your $DC is already locked and you wish to lock the $DC you just claimed from the validator.
Wrap-up
As you might have noticed, our team has done its best to streamline the staking experience to the dot. It takes less than a minute to lock $DC and stake your $veDC to start getting yields from validators.
If you have any feedback regarding this interface and you would like to see additional features added o the UI, please contact our community managers on Telegram. They will make sure to forward your input to the team.
Website | Twitter | Telegram | Discord | Reddit | TikTok